
.webp)


Do not underestimate how important it is to create a Facebook business page even though Gen Z will tell you that Facebook is only for old people! With over 2.85 billion users, it’s almost guaranteed that somewhere in there is a relevant audience and target market for you. Facebook itself offers you a free way to reach them using a business page, which can be a significant tool in your marketing toolbox.
It will not take you long to create a Facebook business page, but the impact on your business has the potential to be huge. In this article, we will review the 12 steps you need to take to get your business page up and running.
How Will Creating a Facebook Business Page Help Your Business?
Put simply, a Facebook business page is free advertising for your business. It’s a public page that you can use in lieu of or in addition to your website and where you can share whatever information you choose. Your page will show up in Facebook searches, giving your business visibility among people who are looking for whatever it is you are selling. You can also encourage your friends and followers to tag the page and share your content, expanding your reach even further.
If you set up your page right and keep it updated regularly, your Facebook business page can play a significant role in your marketing efforts and seriously improve your bottom line.
How to Create and Set Up a Facebook Business Page
Open up Facebook in a separate tab and follow along with the next 12 steps to create your Facebook business page and get it up and running quickly. If you have additional questions, you can also check out Facebook’s official guidance.
Step One: Sign-up or Log-in to Facebook
You do need to have a personal account in order to create a Facebook business page. If you have one already, simply login. Your business page will be completely separate from your personal page with no shared information between them, so there’s no need to worry about privacy issues.
If you do not have a Facebook account, you’ll need to sign up for one now. Even if you never post anything on your personal page, you do need to create an account in order to use the business page features and tools.
Why Do I Need to Log into my Personal Account?
Because business pages may be managed by more than one administrator and other roles can also be assigned with different levels of access, Facebook requires that each person have their own personal account which can then be assigned the appropriate permissions for the business page. Again, anything that you share on your personal page is not also shared on your business page and vice versa.
If you feel very strongly about keeping your business and personal life completely separate to the extent that you don’t feel comfortable using your personal Facebook account, you can always set up a new personal profile that you use only for business purposes.
Step Two: Click “Create a Facebook Page” Button or Visit Facebook’s Page
Once you are logged in, there are two ways you can access the area where you go to create your page:
Create from Facebook Link
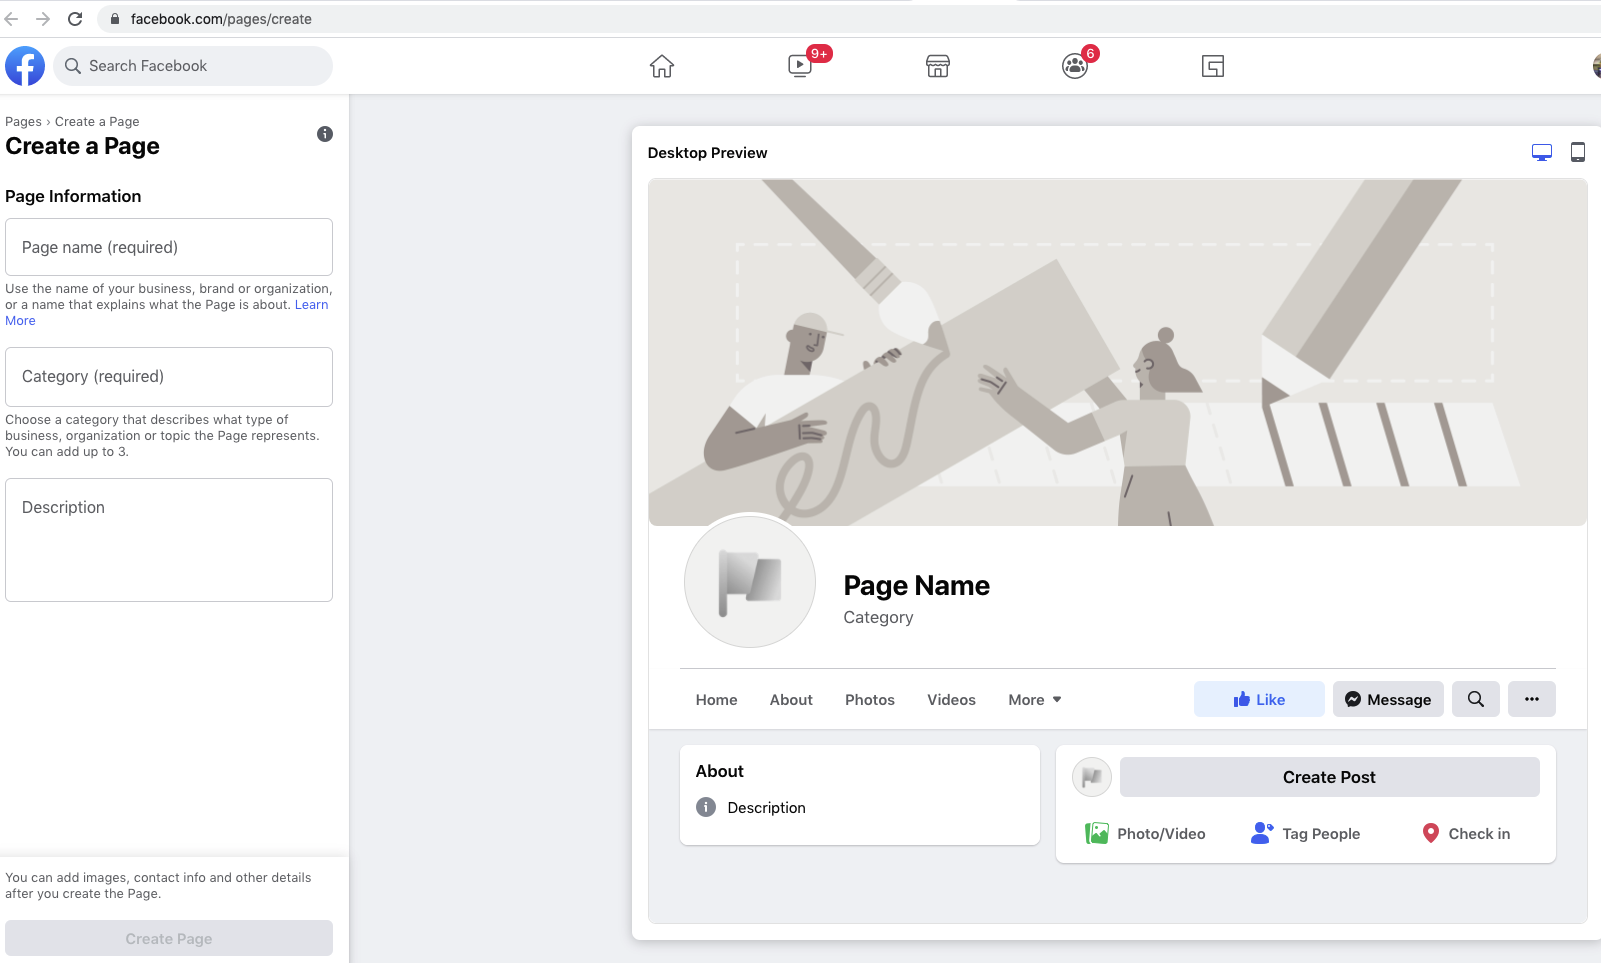
Go to facebook.com/pages/create. This will take you to the screen you see below and you can begin to fill in the information as requested.
Create from Sidebar
Alternatively, from your Facebook homescreen, you can click on “Pages” in the sidebar and then the “Create New Page” button, which will also bring you to the page creation screen.
Step Three: Fill in your Business Information
Once you are on the Create a Page screen, all you need to do is follow the steps and fill in your information. You type the information into the text boxes on the left of the screen and you will see the preview on the right update as you type.
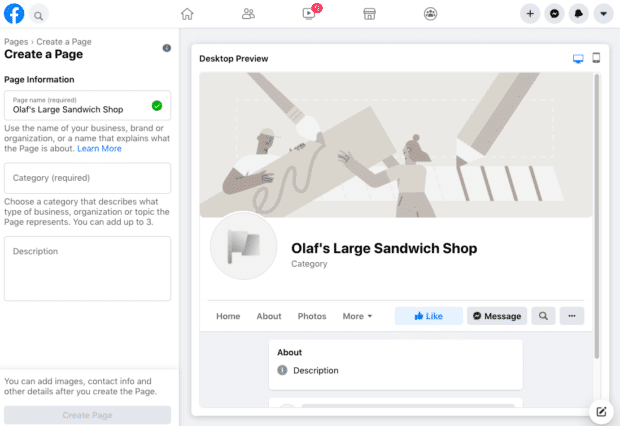
Page Name
The first field you have to fill out is your page name. This is what users will see first when they visit your page and what it will show up as when you comment on other people’s posts or publish your own. It’s best to keep it simple and use the actual name of your business or something that people will search for if they are trying to find your business. You don’t necessarily have to use a full formal name - for example, if your official business has LLC in the title, you may want to leave that out of your page name.
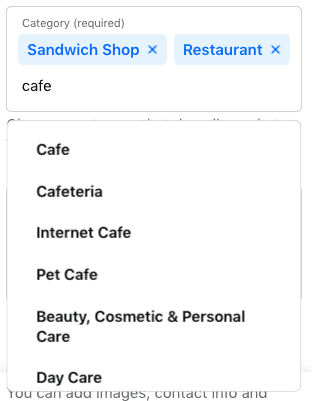
Category
Choosing the categories (up to 3 are allowed) that best describe your business will also help Facebook show your page to those searching for businesses like yours. Once you start typing in the words you can think of, Facebook will automatically show you relevant options that you can choose from.
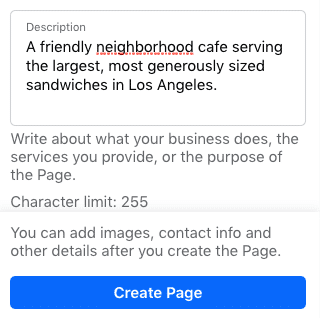
Business Description
You include up to 255 characters describing your business as succinctly as possible. Make sure you include the most crucial information and unique selling point that you would want to share with your potential audience as these couple of sentences are what will appear in search results.
When you have finished entering all of the information, click on the “Create Page” button.
Step Four: Add Your Images
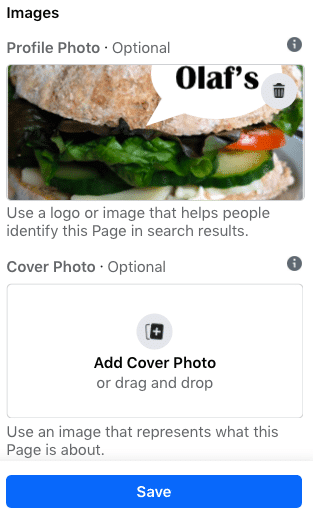
A picture is worth a thousand words, so you’ll want to be sure you choose pictures that best represent the image you want to portray for your business. There are two main images that you need when you create a Facebook business page: a profile picture and a cover photo.
Profile Picture
Your profile picture is in the circle on the top left of your Facebook business page. It will show up next to your business page name in search results and posts. Many businesses choose to use their logo as the profile picture as that is something clearly recognizable to their audience and is on-brand.
The ideal profile picture size is 170x170 pixels and remember that it will be cropped to fit into a circle so make sure there is no important information in the corners!
Cover Photo / Video
The cover image goes across the top of the page and is the most eye-catching and prominent photo that users will see. You could showcase your product or use imagery that speaks to your brand’s personality and values The image size should be 1640x856 pixels.
Source: Facebook
You’ll be able to see what the profile and cover photos will look like in the preview screen, and by clicking the buttons on the top right of the screen you can see how they will look on both mobile devices and desktops. If you don’t like the way it looks, you can adjust the images’ positions by dragging them. Once you are satisfied with how your pictures look, click the “save” button.

Source: Facebook
Step Five: Choose a Username
While your username can be the same as your page name, it does not have to be. The username is how people can find you on Facebook by typing it in after the Facebook URL (i.e. www.facebook.com/your-user-name). The username can be up to 50 characters and should be something easy to remember. Sometimes the username you want to use has already been taken in which case you will need to choose something else. If you see a green checkmark next to the name you put in, then you’ve found one that isn’t already taken and you are free to use it.

Source: Facebook
Once you are happy with your username, click on “Create username” and a confirmation box will pop-up. Click “done”.
Can you Change the Username
You can change your page’s username via the settings menu at any time. It’s important to remember that only page admins are allowed to make this change.
Step Six: Set Up Call to Action Button
When you set up a Facebook business page, you are not only drawing attention to your business and brand, but you can also encourage viewers to take a specific action using a call to action (CTA) button. Depending on what your business does and what your goals are, you can choose the right CTA for you. For example, you may want people to visit your website, follow your page, or place an order.
Click on the “Add Button” box and then you’ll be able to choose the type of CTA you want to add to your page.

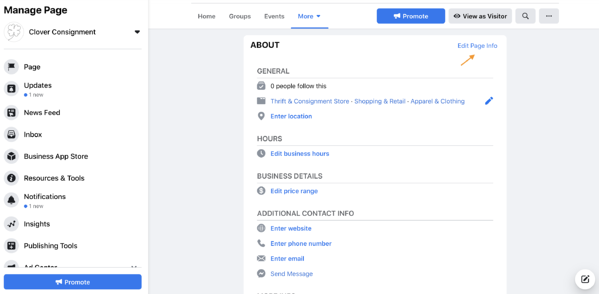
Step Seven: Fill in your Page’s Info
The “About” section is where you can provide your potential customers with important details about your business at a glance. We recommend filling this section out as completely as possible up front, but you can always go back and add more or make changes later on.
To fill out this section, from the “Manage Page” page, click on “More” and then “About”. Then click on “Edit Page Info” and fill in the requested information including business hours and contact information. There is also a “Story” section where you can go into more detail about the background behind your business and other information that may be of interest to your target customers.
Step Eight: Write at Least 10 Posts
This may be the most time consuming step, but it’s an important one! When you create a Facebook business page, it’s obviously going to start out pretty blank. You don’t necessarily want to start drawing potential customers to a page that has no valuable information on it. It’s a good idea to create at least 10 posts to populate the page from the get-go. After that, you can create a content calendar and decide how often you want to post.
Before you panic, you don’t need to post deep articles and time-consuming content - you can include a mix of funny memes (if that fits your brand), information about your products, and links to other articles of interest. To create your first post, simply click “create post” and add any photos or videos as necessary.

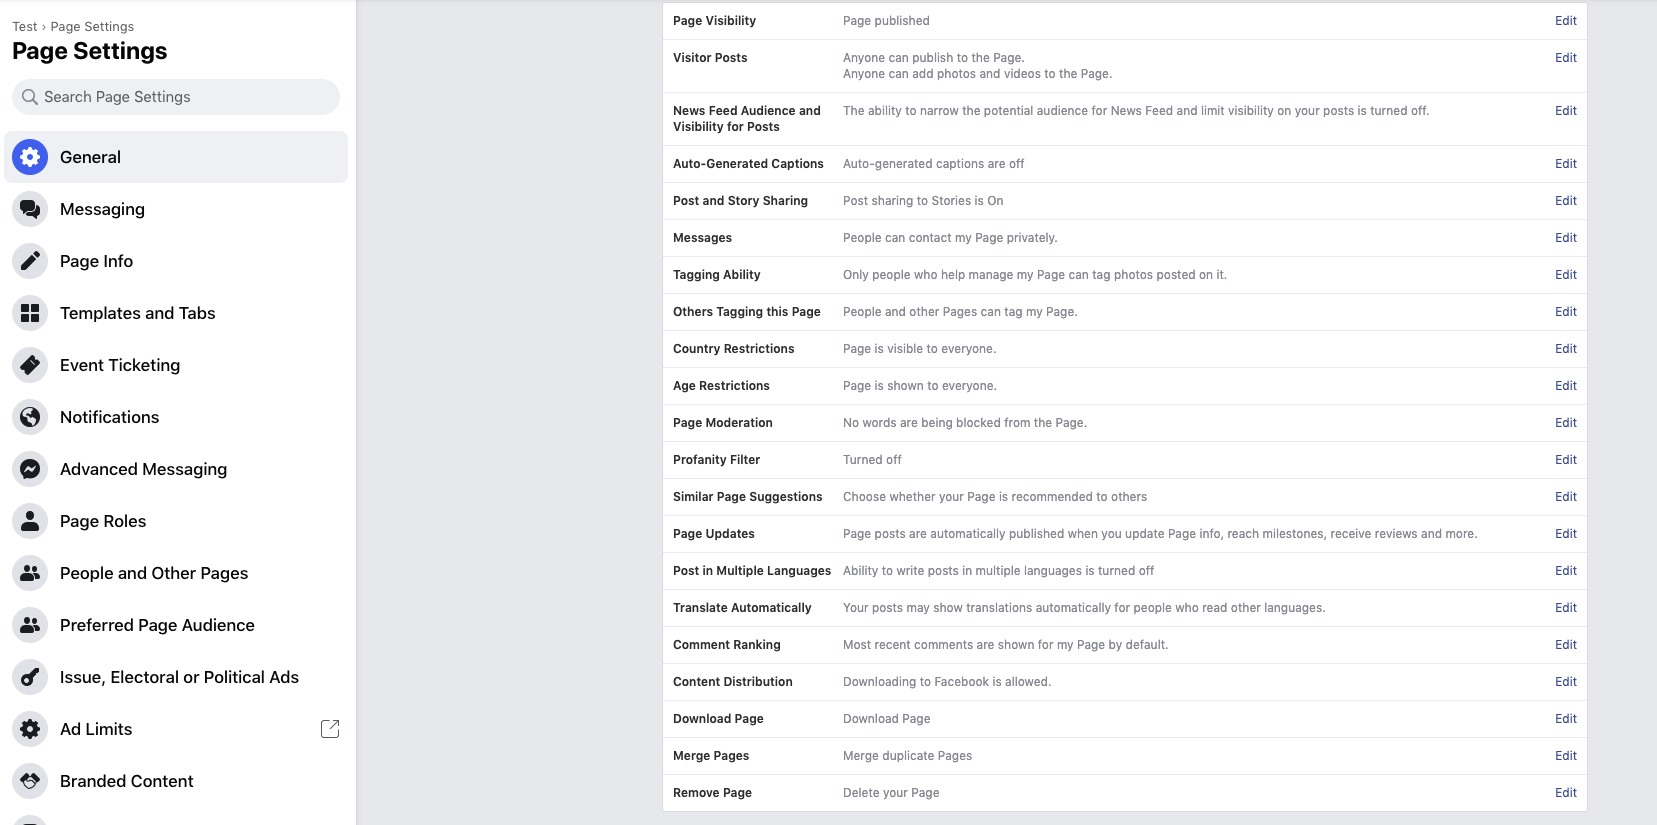
Step Nine: Fill in the General Tab Info
Along the sidebar in the Manage Page view, there is a “Settings” button and then a “General” tab. It’s important to review all of the settings in that tab and make sure the selections are in line with your page goals. This is, for example, where you can make decisions about privacy, age restrictions, and other details about how and where your content can be shared and engaged with.
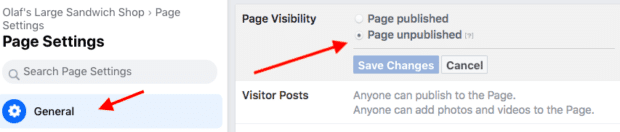
Step Ten: Publish Page
You’ve made it to the best part - it’s time to take your page live! In the same Settings>General menu, click on “Page Visibility” and toggle to “Page published.” Anytime you want to take your page down temporarily while you update it (or permanently for any reason), you can come back to this menu and click on Page unpublished. You can publish and unpublish your page as many times as you wish.
Step Eleven: How to Add and Manage Roles
Now that your Facebook business page is live, you are not quite finished yet. If you have employees or team members (or, let’s face it, your teenager who you’ve roped in to help you!) who will be posting things on the page or interacting with other posts, you will need to give them access.
It’s easy to do this by going back to the Settings menu and then choosing “Page Roles” and then “Assign a new page role”. You enter the name or email address of the person you want to give page privileges to (remember, they must have a Facebook account of their own) and then you can choose their role. Each role comes with different levels of access so you can choose accordingly based on what each person will be responsible for.
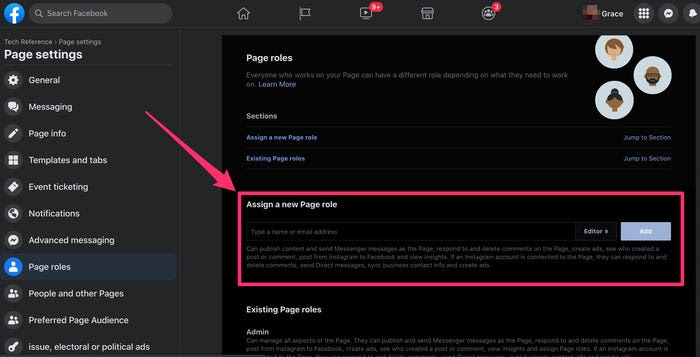
The roles include:
- Admin - full access to edit and make any changes to the page, including assign page roles and adjust settings
- Editor - full editing access, but cannot assign page roles or adjust settings
- Moderator - send messages and/or respond to comments as the page
- Advertiser - can only create ads and view insights
- Analyst - can only see insights and who has published posts on the page
Step Twelve: Invite People to Like the Page
So now you have set up a Facebook business page and it’s live and even has some content on it. Next and final step is to draw attention to the page and encourage people to follow it and engage with the posts. There are many ways you can invite people to like your new page including:
- Invite your existing Facebook friends to like it via the “Invite Friends” button
- Use your website and/or other social media platforms to promote your new page and encourage people to follow it
- Add a link and “follow us” text to your email signature and all promotional materials
- Ask existing and past customers to follow you and write reviews
Set up Ads for Page Likes
Everything that we have described above is completely free of charge to you. Facebook lets you create a Facebook business page at no cost, and you can certainly grow your audience completely organically and watch your sales increase as a result.
However, many businesses cannot afford to wait the time that it takes to grow an organic business and therefore decide to invest some amount of money in a Facebook ad campaign in order to get the page in front of more potential customers. If you are already planning on devoting part of your budget to this, it may be worth working with a digital marketing agency that can help you create a strategy and develop ads that will work better than if you try to create them yourself.
Need Additional Help Setting up your Facebook Business Page?
Hopefully you’ve followed along with this process and have now completed the set-up of your Facebook business page. If not, you should have a good understanding of how to create a Facebook business page so that you can do it when you are ready.
Facebook has created their own useful help pages that are a great resource if you get stuck along the way or want more information about any of the powerful things you can do with your Facebook business page.
.jpg)

.jpg)

